Frequently Asked Questions:
- What is the pricing?
- What does the MakersLED kit include?
- Where is the MakersLED Kit available at?
- What are the dimensions of the fixture?
- What lengths is it be available in?
- If I want more 4-40 screws and nuts, for additional LED’s, what sizes would I use?
- How many LED’s can be mounted to a 12” housing?
- How do I mount Meanwell ELN LED drivers?
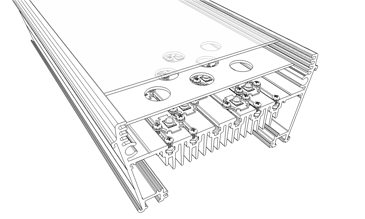
- Why are there so many slots for the splash guard?
- What material is the MakersLED made from?
- What type of fan is included?
- How is the fan powered?
- Why doesn’t the fan look like a standard 92mm fan in the pictures?
- Does MakersLED offer controllers for my LED’s?
- Does MakersLED sell LED’s, optics, drivers, packages? Which LEDs should I use? Where do I buy them?
- What type of LED’s can be used with the housing?
- Do I have to solder my LED’s?
- Is thermal paste needed?
- Why use T-slots for mounting LED’s when there are alternatives, such as double stick thermal pads and tapes?
- How do I make my own plastic ends and covers?
- Can the custom dowel supports be purchased?
- What kind of finish can I expect on the aluminum parts?
- How do I make the dowel supports?
- If your question isn’t listed here, email support@makersled.com
What is the pricing?
About $50/ft (kit), check the retail outlets on our “where to buy” page.
What does the MakersLED kit include?
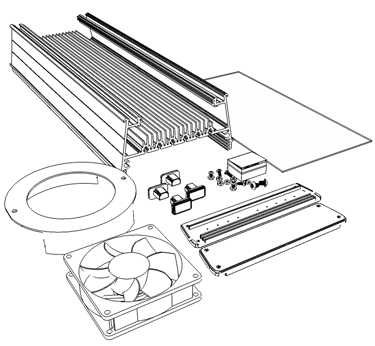
Each kit will include:
- cut to length heat sink
- matching length splash guard
- two plastic end caps
- four t-slot plugs
- 92mm fan 12V [one per 12”]
- custom 92mm fan bezel [one per 12”]
- stainless steel assembly hardware (exposed parts)
- 4-40 bolts and nuts, enough for 25 LED’s [per 12”]
- nylon washers, enough for 25 LED’s [per 12”]
Where is the MakersLED Kit available?
We have multiple vendors. Check our Where To Buy page.
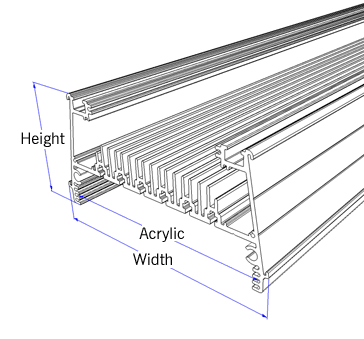
What are the dimensions of the fixture?
Height: 3.15in
Width: 6.45in
Length: 1ft Increments
Acrylic: 5.9
Lanes of LEDs: 5
A 3D Sketchup Model is available Here
What lengths is it be available in?
Check with our vendors for standard lengths. The heatsink can be ordered in increments of 6 inches, and lengths up to 6 foot. Custom lengths and longer housings may be available, please inquire.
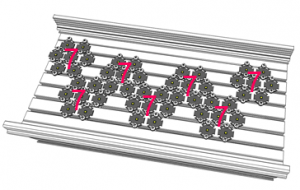
How many LED’s can be mounted to a 12” housing?
A lot! Over 30 LED stars can be mounted, repositioned, and upgraded within a 12” length of fixture.
We recommend that you limit your total number of LEDs to around 100-120Watts/foot for proper LED cooling.
If I want more 4-40 screws and nuts, for additional LED’s, what sizes would I use?
Additional 4-40s can be purchased from your local hardware store, McMaster Carr, or one of four online vendors.
Specification:
4-40 screws, 3/8”long
4-40 nuts
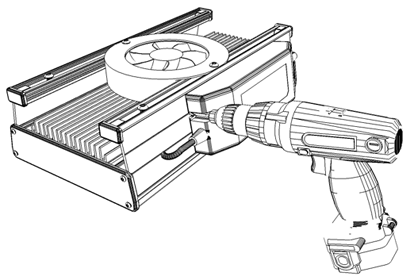
How do I mount Meanwell ELN LED drivers?
The MakersLED sidewalls are designed to accept Meanwell-ELN-60-48-D/P
models. Place the driver on the side of the fixture and mark the position of the mounting holes. The built-in reference grooves on the fixture will help position your drill bit and help it from not walking up and down when drilling. Use self tapping
screws or bolts to attach the driver. A quarter inch hole can be drilled into the side of the fixture to run the wires into the LED housing.
Balancing your fixture with LED drivers is not an issue for fixed (bolted) and rack mounted fixtures. But, for pendant hanging, we recommend using one driver on each side for balance and looks. One LED driver is typical for each color to enable independent color control.
Why are there so many slots for the splash guard?
Lenses come in all heights and the multiple slots allow the splash guard to keep close to the lenses. Depending on lens height, the splash guard may help hold the lenses onto the LED’s.
The additional slots could also allow for printed circuit boards (PCBs) to be slid into the fixture for power inlets, interconnects, or LED drivers.
One could also design a custom piece of opaque acrylic with holes for your LEDs to illuminate through if you wanted to cover up wiring (shown below). Ponoko and Pololu both offer affordable acrylic laser cutting services. Inkscape is free software which you can design the artwork in.
In most cases, when the LEDs are turned on, they will be so bright you won’t be able to see the underside even when you are looking! The built in t-slots also offer a great place to tuck your wires into for a clean look. Long lengths of extrusion also help hide wires.
What material is the MakersLED made from?
Makers LED is made of heat sink grade 6063 aluminum. Plastic parts are made of ABS plastic.
What type of fan is included?
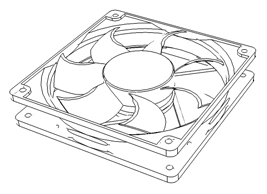
The fan is a standard 92mm x 25mm fan. Any fan with these dimensions will also work. It is a 12VDC fan.
How is the fan powered?
The fan can be powered by a MakersDRIVER, or using an AC to DC power adapter with a 4-pin molex PC power connector. These adapters are readily available through LEDGroupBuy.com, eBay, Newegg, and other online vendors. Any 12v DC power source, such as a common Radio Shack power adapter with enough amperage should also work.
Why doesn’t the fan look like a standard 92mm fan in the pictures?
The fan shown is a standard 92mm fan! It has a plastic bezel covering it. We felt that the bezel dressed up the fixture.
Does MakersLED offer controllers for my LED’s?
Yes, we offer the MakersDRIVER and MakersCONTROLLER for the highest level of integration.
Other controllers could be easily adapted to fit the MakersLED top slots and T-slots (ie: Potentiometers,DIM4 , Typhon, Arduino, Profilux, Digital Aquatics, and Neptune Apex).
Does MakersLED sell LED’s, optics, drivers, packages? Which LEDs should I use? Where do I buy them?
We do not sell LED’s or optics, please visit one of our reseller channels for many LED options.
MakersLED allows you to pick, choose, and reconfigure your setup unlike any commercial LED system on the market. You choose how much power, spectra, and light spread. You find the most cost effective LED solution. The MakersLED platform allows you to you start with a small number of LEDs and drivers and add more as more as you needs change.
If you want to simply clone the LED configuration of an existing commercial LED fixture, check out some of the most popular LED recipes.
What type of LED’s can be used with the housing?
Just about any LED can be used with the MakersLED fixture. Even though the T-slots are based upon 20mm stars, many other sizes and designs can be used. Larger LED boards (ie, multichip LEDs) and triple diode ‘pucks’ can be turned and bolted down at angles. Strip style LED’s can be mounted in virtually any direction, parallel, perpendicular, or at angles.
Do I have to solder my LED’s?
No, soldering is not necessarily needed. There are a number of options by other vendors that make plug and play or friction fit electrical connections to the LEDs. However, soldering can be easily mastered and is the recommended connection.
Is thermal paste needed?
Yes. We strongly suggest using thermal paste or thermal grease to effectively dissipate heat from your LED’s. Heat will deteriorate your LED’s, decreasing light output and longevity. Thermal paste is available through your LED vendor.
Using less thermal paste is better than using too much. The thermal paste’s job is to fill in the minute imperfections of the two surfaces. Standing air is a bad thermal conductor. Aluminum to aluminum contact will almost always outperform thermal paste.
Why use T-slots for mounting LED’s when there are alternatives, such as double stick thermal pads and tapes?
We do not recommend using double stick thermal pads and tapes because they are generally poor when it comes to thermal performance. In addition, the T-slots offer a clear advantage because of their ease of use and ability to reconfigure LED locations at any time.
How do I make my own plastic ends and covers?
You don’t have to make your own because these are included with each kit. If you want additional pieces, please contact us.
Can the custom dowel supports be purchased?
No, not at this time.
What kind of finish can I expect on the aluminum parts?
The aluminum is clear anodized which will help protect the finish from staining.
How do I make the dowel supports?
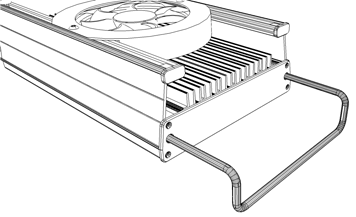
1/4” aluminum rod is available at most hardware and home improvement stores. By measuring and bending the aluminum into your desired shape, anything is possible. There is a location inside the fixture that will allow you to add a set-screw to securely attach the dowel. If this feature is used, the plastic end caps have a target marking where you can easily drill a 1/4″ hole.


Awesome looking fixture!
Pingback: Great DIY LED mounting option
Will there ever be fixtures that are wider? I would like to add T5 into the mix. I want to purchase two 24″ or one 48″ fixture but I want to mount the T5’s on the inside along the led’s. Regardless, I’m super excited to see someone make this type of heat sink. Maybe if there is no future for a wider fixture, Ill have to mount the T5’s on the opposite sides..
Hi Oleg,
We are always exploring other fixture shapes but it is unlikely we will ever go much wider due to limitations of the extrusions process.
You may be able to use rods or bars to attach your T5’s to the side, along with this concept:
http://makersled.com/images/forums/pendant.jpg
Thanks for the info! I kinda assumed that much. I can understand the limitations of extrusion. I may get two and cut off the sides and combine them side by side. I’m gonna try to find your sketchup model and work with that for now.
Howdy,
I have a standard 55 gallon (48″(L)x13″?(D)x21″?(H)) and i was wondering if 2 18″ heat sink kits would be enough? My only concern is that the heatsinks are only about 6.5″ wide, would height placement and optics on the LED’s be the solution for my concern?
Thanks and awesome product!
Hi Pat,
2 18inchers should work out nicely. If you have limited vertical height (ie, less than 1 ft) then go with no optics on your LEDs for more light spread. thanks and good luck!
Hello,
I have a Reef tank which dimensions are 96″ x 34″ x 28″, I’m really interested on your fixture but I’m not really sure the 72″ will cut it.
Right now I have six Aquaillumination modules, these are placed parallel to the depth of the tank instead of the width, with these I’m almost gaining some light front to back.
My target is a full blown SPS Reef tank, I already have some colonies doing well under these lights but these are placed at strategic points where I know the light will work, once I fill in these spots I know I will be short on light.
If I decide to get the 72″ fixture, would it suffice just one or would I need to place two front to back?, the fixture would be placed 18″ over water surface.
Thank you and sorry for the long post.
Hi Juan,
I think you should do 2 parallel fixtures running the length of the tank to be safe. Currently I have two 4ft parallel fixtures over my 24″ width tank and they are only 10″ off the surface – The light spread and fill is excellent.
Previously, I had 4 18″ fixtures (perpendicular to the length of the 4ft tank) and even then I had some serious dead spots. Now with my 4ft MakersLED units I have complete light fill. Even though your tank is wider, I think the raised 18″ over the water surface will take care of the spread.
We can offer non-standard lengths – if you want 7-8 foot long fixtures let me know. Send me your shipping information and I can quote you – andy@makersled.com
My 2x4ft build: http://www.facebook.com/media/set/?set=a.254887631278131.42691.149680928465469&type=1
We have had a some recent feedback from people using using one fixture down the length of their 24 inch tanks successfully. They used 40 and 60 degree optics with about 14 inches off the water surface.
This is 24″ deep? Like a 120G 48″Wx24″Hx24″D.
Yes, the narrower optics work well for a 24″ tank depth (<60degree lenses)
I have a 84″ x 24″ x 24″ mixed reef tank with mostly SPS. In the future I would like to upgrade to a 72″ x 24″ x 36″(wide) tank. What would you recommend for configuration of lights and number of LED’s. I would like to be able to add to the lights when I make my upgrade in tanks. I dont know where to start. One long system or multiple 12″ or 18″ lights.
Randy
Hi Randy,
Sorry for the delay in getting back to you.
If you are going to be upgrading, I would lean towards multiple 18″ fixtures. It is more difficult to add and reconfigure LEDs on the longer fixtures and running the 18″ fixtures perpendicular to the length of your tank will also provide good light spread without having to put the fixture too high above the water’s surface. (However, one long fixtures would be easier in terms of hanging and mounting.)
If you have any LED related questions, you might want to check with the people at LEDGroupbuy.com. They are reef lighting experts, and they may be able to give you some more ideas.
Hello , how many square inch of alu are on a 12″ length fixture? I mean, including the back fin and side wall, this is to make my calculations to figure the rigth length to I need.
By the way nice product, I like it !!
Regards from MX
Hi Gabriel,
For fixtures bought at LEDGroupBuy.com – a 12″ fixture is exactly 12″ WITH the endcaps installed.
For the general width/height dimensions, see: http://www.ledgroupbuy.com/product_images/e/580/nano_reef_makersled_dimensions__43878_zoom.png
For Sketchup 3d Models, see: http://sketchup.google.com/3dwarehouse/search?q=makersled&styp=m&scoring=t&btnG=Search&reps=1
For square surface area (heatsinking) see: http://www.nano-reef.com/forums/index.php?showtopic=304322
Thank you for the reply, was very useful.
Regards.
Gabriel
I understand you are making a programmable controller with drivers that can be intergrated with the MakersLED housing.
How long before this is ready for release?
I been waiting and need to move on with my project and would love to use this
with the MakersLED .
Any date when this controller/driver will be released ?
Thanks
in 2 months 🙂
WOW that’s great but olease hurry up because now I have to wait 🙂
Throw some dimmable features in for multiple bands .
And please make it all solderless for us who really don’t want to solder.
People who don’t want to solder end up buying an already made panel .
Thanks so much !
Hi
Can you tell me if this solderless LED will work with the MakersLED heatsink ?
There no size measurement mention so I don’t know if it will work.
If you want to delete link it’s OK with me I understand but please tell me yes or no..Thanks !
http://www.rapidled.com/solderless-cree-xp-e-blue-led/
Hi Rainer,
Yes, that solderless LED will work too! I have personally tried these
Oh yeah ..thanks a million..you rock !
Would you recommend the MakersLED kit in a hydroponic horticultural application? I am building a plant growth chamber that will operated at approximately 85% relative humidity. Temps will range from 30° – 85° F. Thank you.
Hi Phillip,
The heatsink will work very well for horticulture applications.
As for or most electronics, as long as you can keep below 90% RH (non-condensing) you should be safe.
As you may know, a 3:1 ratio of blue:red LEDs is pretty typical for horticulture applications.
If you have any more questions do let us know.
Hey,
Do you know if the BJB solderless connectors work with the slots in the heat sink? They match the CREE leds so I don’t believe so but wanted to verify.
Thanks,
yes, they do work! check out http://makersled.com/?p=519
Yeah, I saw that post after I asked the question.
Thanks!
I have 36 x 24 x 24 (LWH).
With the width if the heatsink, should I buy one 36″, two 36″, or something different?